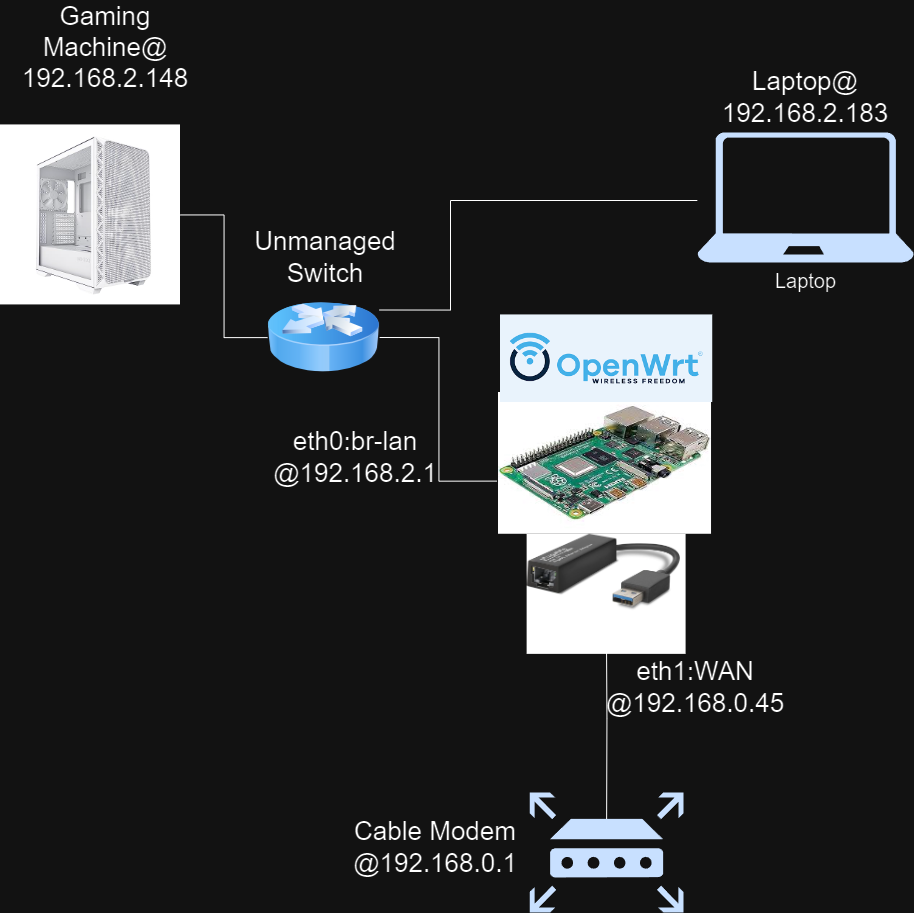
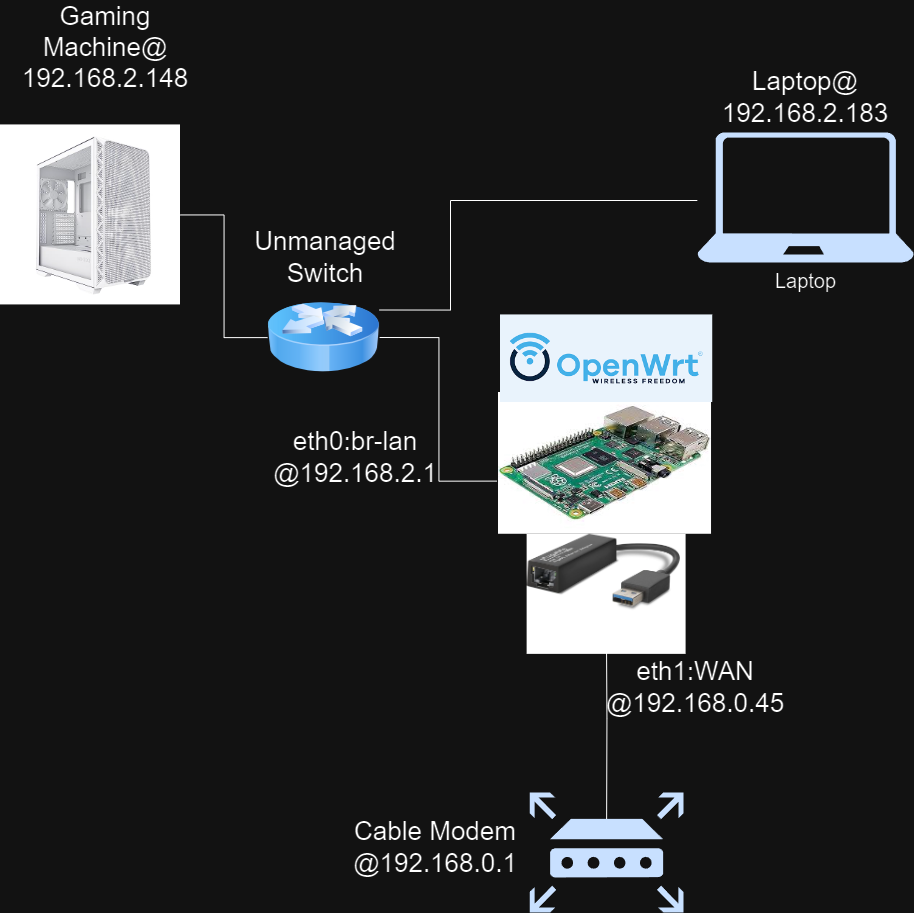
In this tutorial we will cover how to build the OpenWRT Linux distribution for a Raspberry Pi 4B and how to configure the Raspberry Pi as a router. We will configure the router to use an unmanaged switch to allow for client devices to attach to the router. The following is a network diagram showing how the devices will be connected.
You will need
- Hardware
- Raspberry Pi Model 4B
- Micro HDMI to HDMI cable (Link to Amazon page)
- 1x “Plugable” brand Model USB3-E100 USB to Ethernet Adapter (link to Amazon page)
- 3x Ethernet Cable
- MicroSD card
- USB to MicroSD card adapter
- An unmanaged switch
- Software
- A Windows computer with a virtual machine running the Latest Ubuntu
Building the firmware image
To start, we will need to set up a Docker container which will host our build environment. We do this to isolate our build environment from other computer resources and because Debian is a more stable distribution on which to build OpenWRT firmware images. Start by installing Docker on Ubuntu.
sudo apt install podman-dockerCreate a directory where you will store your Dockerfile and use touch to create the Dockerfile.
mkdir -p ~/code/openwrt-docker-build/dockerfilefolder && cd ~/code/openwrt-docker-build/dockerfilefolder
touch Dockerfile
Open Dockerfile in a text editor and paste the following into it. Replace all-instances of mark with your Ubuntu username and /home/mark with the path to your home directory.
FROM debian:bookworm

RUN apt-get update &&\
    DEBIAN_FRONTEND=noninteractive apt-get install -y \
            sudo build-essential clang flex bison g++ gawk \
	gcc-multilib g++-multilib gettext git libncurses5-dev libssl-dev \
	python3-setuptools rsync swig unzip zlib1g-dev file wget && \

    apt-get clean && \
    groupadd -g 1000 mark && \
    useradd -u 1000 -g mark -d /home/mark mark && \
    echo 'user ALL=NOPASSWD: ALL' > /etc/sudoers.d/user
Now within that same directory ( ~/code/openwrt-docker-build/dockerfilefolder ) run the following
sudo docker build -t openwrt-debian-12-build .You now have a container ready to run! Run it with the following command.
sudo docker run -v /home:/home --user 1000:1000 -it openwrt-debian-12-buildYou are now running a docker container in the same file system as your host machine (the virtual machine) We can see this by running a few navigation commands.

In a separate terminal navigate to ~/code/openwrt-docker-build and clone the OpenWRT repository from GitHub. Next we will checkout the latest branch which, at the time of writing, is 23.05.
git clone https://git.openwrt.org/openwrt/openwrt.git
cd openwrt
git branch -a
git checkout openwrt-23.05
Now, navigate back to the terminal that is running the Docker container and proceed to update and install the package feeds.
cd ~/code/openwrt-docker-build/openwrt
./scripts/feeds update -a
./scripts/feeds install -a
Once this operation is done we are ready to configure our custom image. Do this by running
make menuconfigWhich will pull up a terminal GUI that will look like the following upon start.

Change the target system to “Broadcom BCM27xx”, the subtarget to “BCM2711 boards (64 bit)”. The target profile will then be automatically assigned as “Raspberry Pi 4B/400/CM4 (64 bit)”. Make it look like the following screenshot.

Next, we need to add the following packages to our image. For each, I have included the parent directories in the bullet list. To select them, find them in the hierarchy and then press <space> twice until an asterisk <*> is shown.
- Kernel Modules
- USB support
- kmod-usb-net-asix-ax88179
- USB support
- LuCI
- Collectins
- luci
- luci-ssl
- Collectins
Once you have selected those you can exit menuconfig saving your configuration on the way out. We are now ready to build! Run the following command to build your firmware image.
make -j$(nproc) download worldThe build process will take a while so be patient. You can watch the CPU cores do their thing by pulling up “System Monitor” on Ubuntu.

When the build process completes you will find the output at
/home/mark/code/openwrt-docker-build/openwrt/bin/targets/bcm27xx/bcm2711The completed firmware should have a name like
openwrt-bcm27xx-bcm2711-rpi-4-squashfs-factory.img.gzFlashing the image
Pull up the Raspberry Pi imager (can be found on the Ubuntu software store). For device choose “Raspberry Pi 4”.

For OS scroll down to “use custom” then navigate to
/home/mark/code/openwrt-docker-build/openwrt/bin/targets/bcm27xx/bcm2711and choose your image
openwrt-bcm27xx-bcm2711-rpi-4-squashfs-factory.img.gz
Now insert your microSD card into the computer and choose that option under the “Choose storage” button on the Raspberry Pi Imager.

Once that is all configured hit next and then choose “No” when prompted to apply OS customization settings. The image will then be loaded onto the MicroSD card. Once it’s done, insert the microSD card into the Raspberry Pi and turn it on. You will need to have the Raspberry Pi connected over HDMI to a monitor for the next step. Plug in your keyboard as well.
Connect the Raspberry Pi to your existing network
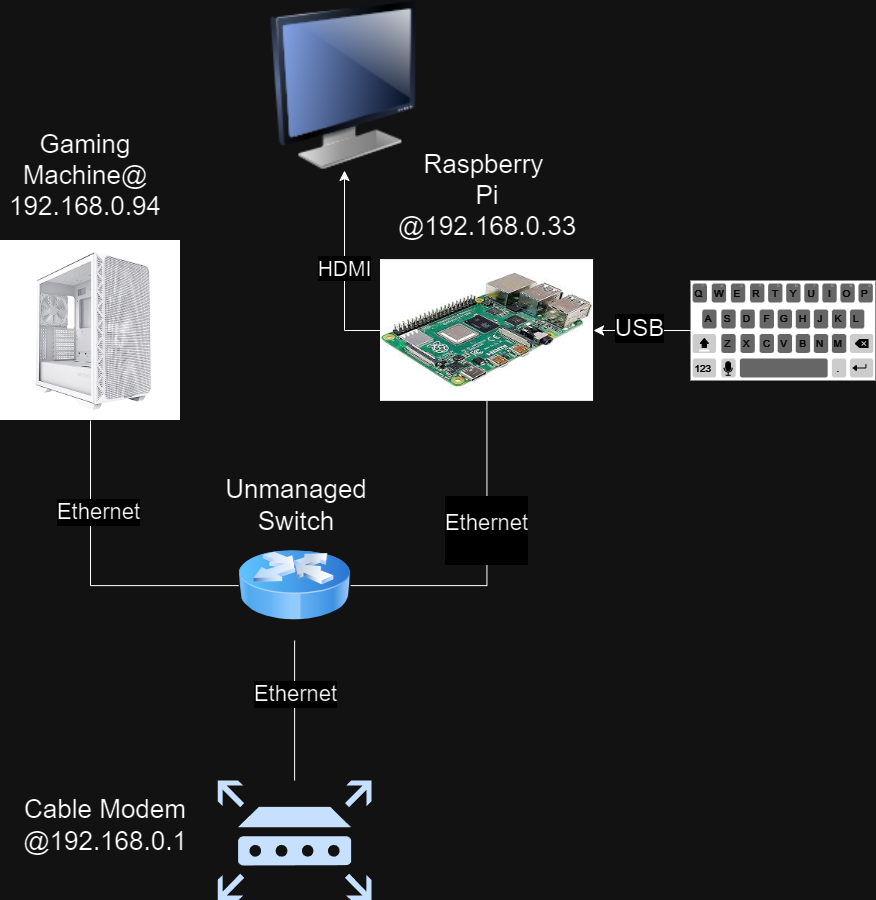
To be able to SSH into the Raspberry Pi (and later to use LuCI) you will need to connect either directly to the Raspberry Pi using an Ethernet cable from your computer (not covered in this tutorial) or you will need to connect it to your existing network. In my setup, I have it connected to an unmanaged switch so that my computer can connect to it over SSH. I’m using the following network arrangement shown in the diagram below.
Configuring OpenWRT
Connect to the Raspberry Pi with HDMI to a monitor and attach your keyboard. Once the Raspberry Pi boots you will be prompted with a shell input that looks something like this.
root@OpenWrt:/# Start by typing
passwdNow change your password to something secure. Next enter the following commands which will allow for automatic DHCP assignment of an IP to your Raspberry Pi. This will allow us to connect temporarily until we assign a static IP to the Raspberry Pi in a later step.
uci set network.lan.proto=dhcp
uci commit
/etc/init.d/network restart
Now you can run
ip aWhich will print out an output similar to the following.

Find the “inet” line under “br-lan” (highlighted in red) this is the IP address you will use to connect to the Raspberry Pi. For me, that address is 192.168.0.33. Open up a web browser and enter “192.168.0.33” into the navigation bar.
Using LuCI to Configure OpenWRT router settings
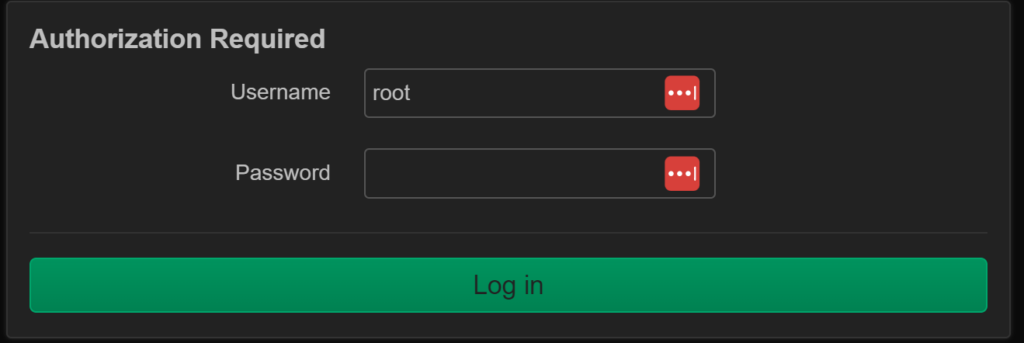
Enter 192.168.0.33 into your web browser and LuCI will open to a password prompt screen. Enter the password you configured earlier using passwd.
Within the LuCI interface, first navigate to Network -> Interfaces Select Add new interface name the interface “wan” with protocol “DHCP client” and choose Eth1 for the Device. Then select Create Interface.

You will then be moved to the DHCP Server submenu and you want to leave it as “No DHCP Server configured for this interface”. Do not press “Set up DHCP Server” because the modem is already serving an IP address to this interface.

If you instead presented with this screen make sure to uncheck the box:

Under Firewall Settings assign the interface to the “WAN” zone.

Now you be sent back to the interfaces menu. Hit save and apply.
Next you need to navigate to the Devices tab and click “Configure” on eth1. Leave eth0 unconfigured.
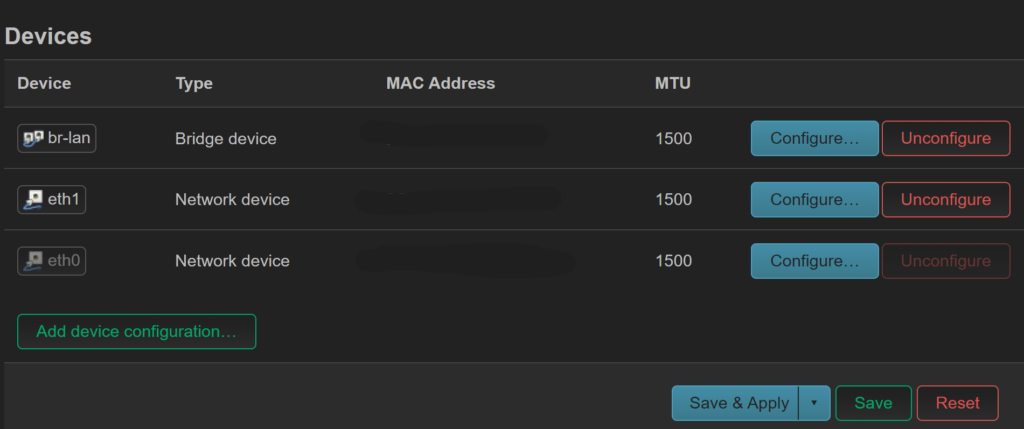
Leave the settings (shown below) as default.
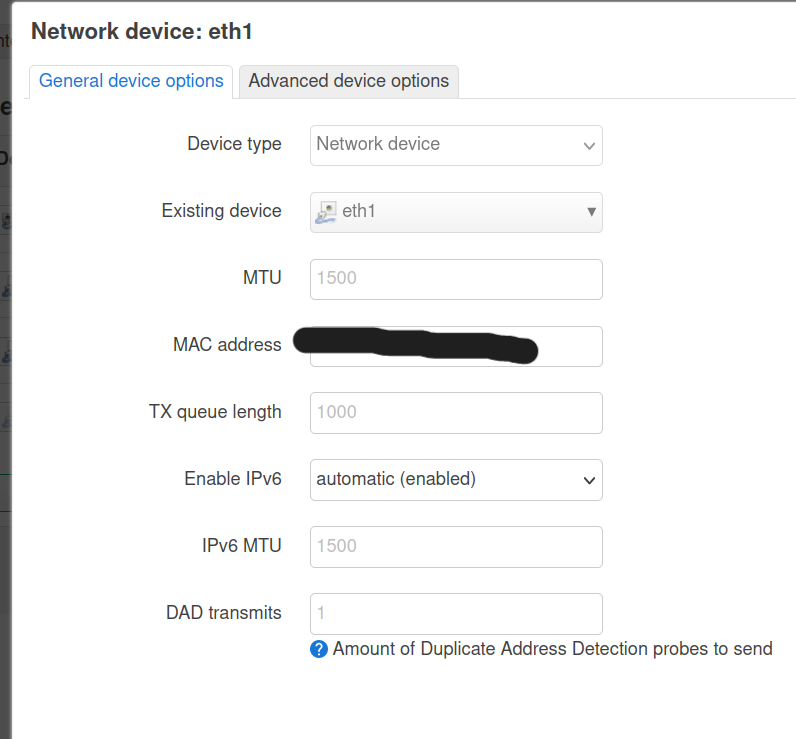
Save then save & apply.
Now you need to edit the “lan” interface (“br-lan” device). Navigate to interfaces then hit Edit next to “br-lan” and then navigate to general settings and change the protocol to Static Address. Choose a static address that does not conflict with your modem’s address range. So, for example, my modem assigns addresses in the range 192.168.0.2 to 192.168.0.254 so I chose the CIDR block 192.168.2.1/24 for “lan”. See the screenshot below.
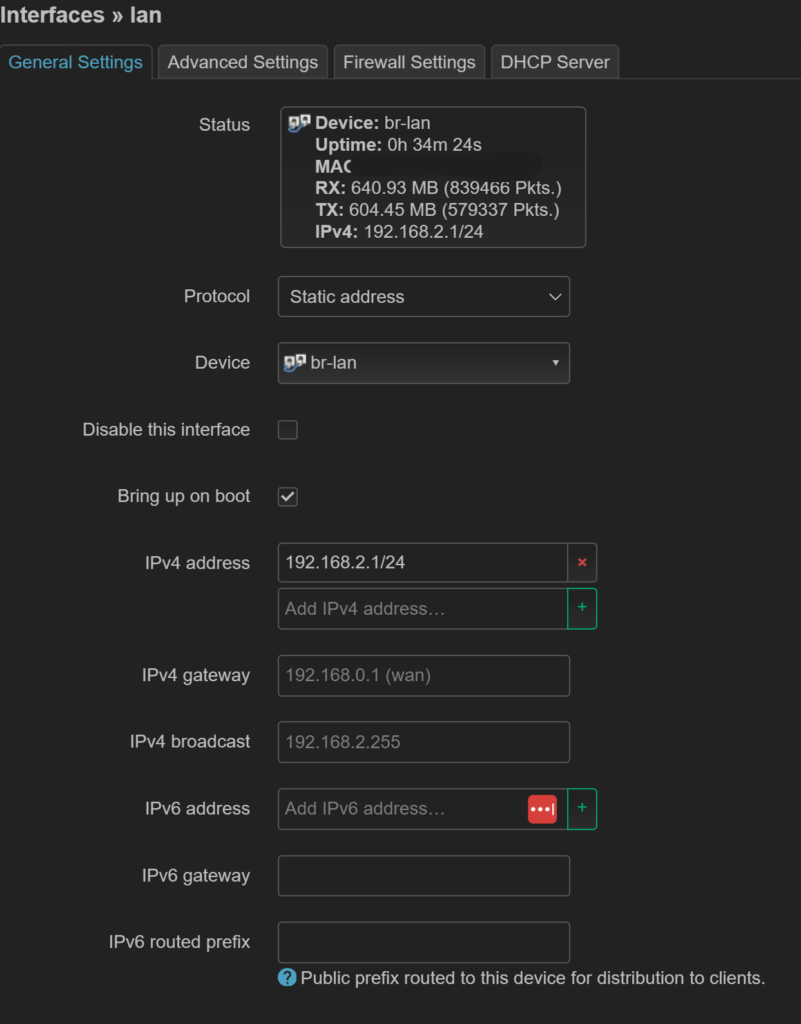
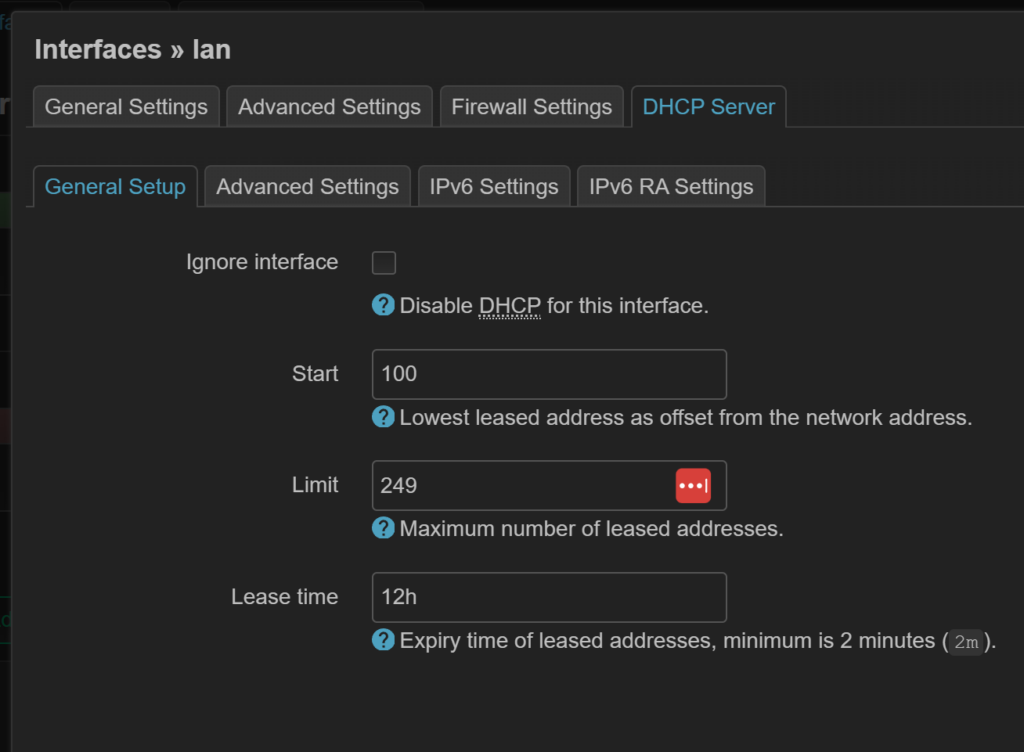
Next navigate to “DHCP server” and choose the settings in the screenshot below.
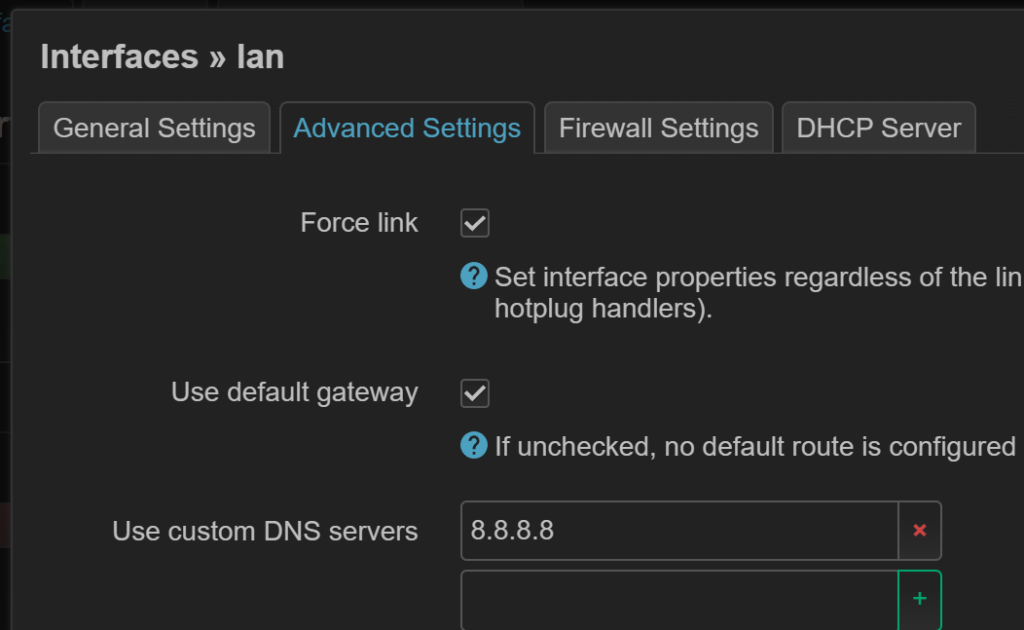
Under advanced settings enter “8.8.8.8” for the “Use custom DNS servers” option. This is a Google DNS server.
Once again click save then save and apply. You will receive a warning that looks like this.

Click “Apply and keep settings”. You will almost certainly lose connection to the LuCI web interface at this point. Now, you need to change your network topology to look like this. You don’t need the laptop but it represents other client devices.
If your Windows machine is not able to connect to the internet open a command prompt and type.
ipconfig /renewWhich will make the windows machine request a new dynamically assigned IP address from the Raspberry Pi. You’re done! You can connect more devices to the unmanaged switch and essentially use it as your router’s ports.
Conclusion and next steps
In this article we build the OpenWRT firmware and used it to configure a router using a Raspberry Pi and an unmanaged switch. This was a great learning experience in the fundamentals of networking and gives the reader a chance to explore the inner workings of routers. From here, you can look into further customization of your OpenWRT router such as by configuring an adblocker.