Link to Demo
Link to GitHub Repo
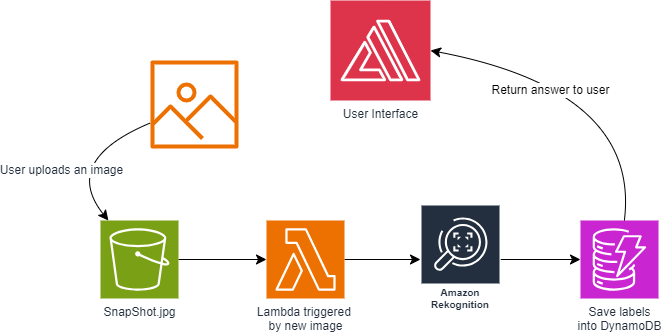
Recently, I built a complete web application that uses AWS Rekognition to produce labels for any given input image. In this article I walk through how this project was built. The image below shows the high level architecture used in the project.

The core functionality is as follows. The user selects an image which is automatically uploaded to an S3 bucket. The upload operation then triggers a Lambda function which utilizes AWS Rekognition to find labels. The Lambda function then posts the result to a DynamoDB table. The front end then grabs the labels from the DynamoDB table and returns this output to the user.
In the next sections I will walk through each step I took to complete this project. For the full code listing please check out the GitHub repository.
Step 1 – Create an Amplify Web Page
Start by creating an AWS Amplify project and connecting it to the GitHub repository that will hold the HTML, CSS, and JavaScript files. By connecting the Amplify project to a GitHub repository you can enable automatic builds when you push a commit. Amplify will provide the front end for the project.
Step 2 – Upload to S3
I followed this tutorial provided by AWS to perform simple uploads. I will go through the core steps here as well.
- Create an S3 bucket and make it publicly accessible.
- Go to Amazon Cognito and create an identity pool for unauthenticated users in the same region as the S3 bucket.
- Enable guest access and add a guest role. Give this guest role S3 permissions and DynamoDB permissions.
- Configure CORS for the S3 bucket so that JavaScript can upload to the S3 bucket from a separate origin.
First we write the following lines to create the S3 service object and configure the AWS SDK.
var albumBucketName = "awk-rekognition-project";
var bucketRegion = "us-east-1";
var IdentityPoolId = "us-east-1:8956197a-dc13-4b15-829f-127d2fe0cd92";

AWS.config.update({
	region: bucketRegion,
	credentials: new AWS.CognitoIdentityCredentials({
	IdentityPoolId: IdentityPoolId})
	});

var s3 = new AWS.S3({
	apiVersion: "2006-03-01",
	params: { Bucket: albumBucketName }
});
Then in the ‘handleSubmit’ function we simply create an upload object and associated promise.
var upload = new AWS.S3.ManagedUpload({
	params: {
		  Bucket: albumBucketName,
		  Key: fileName,
		  Body: myfile
		}
	});

var promise = upload.promise();

promise.then(
        function(data) {
		alert("Successfully uploaded photo.");},
	function(err) {
		return alert("There was an error uploading your photo: ", err.message);});
Step 3 – Write the Lambda Function
- Write a lambda function (link to the lambda function on GitHub) that can perform label recognition and write to DynamoDB.
- Create a trigger connected to your S3 bucket that will trigger an event each time something is added to the bucket.
- Under “Configuration” and then “Permissions” edit the Execution role to have S3 access and DynamoDB access.
Step 4 – Create the DynamoDB Table
Create the DynamoDB Table and add ‘fileName’ as the primary partition key. This database will be accessed by our final JavasScript function to access the label results.
Step 5 – Write the JavaScript code to pull labels from DynamoDB
The following code works similarly to the S3 JavaScript code. First we initialize the DynamoDB service client.
// Create the DynamoDB service object

var ddb = new AWS.DynamoDB({apiVersion: '2012-08-10'});
then in the ‘handleSubmit’ function we set up the database parameters and call the getItem function. The timeout is to allow time for the DynamoDB table to update before the labels are retrieved.
var ddbParams = {
	TableName: 'RekognitionProjectTable',
	Key: {
		'fileName': {'S': fileName}
		},
		ProjectionExpression: 'labels'
	};

setTimeout(function(){
	ddb.getItem(ddbParams, function(err, data){
	if (err){				console.log("Error", err);
		} else {						console.log("Success", data.Item);			document.getElementsByName('display')[0].value=data.Item.labels.SS;}
	});
	}, 4000);
Conclusion
This project was a comprehensive investigation into both front end and back end AWS services. It allowed me an opportunity to create a useful computer vision application using a serverless backend.
Leave a Reply